


[vc_row][vc_column][vc_column_text]
Contour has been on the makeup scene for years, but it’s recently seen a rise in popularity thanks to the likes of Kim Kardashian bringing it to the mainstream.
When looking for techniques on how to contour, it’s easy to become inundated with an endless stream of videos and information.
We’ve created the only guide you’ll need, so forget about the crazy Instagram tutorials and get stuck into the real world of contour.
What is Contour?
[/vc_column_text][vc_single_image image=”3008″ img_size=”full” alignment=”center”][vc_column_text]Before you learn how to contour, it helps to know how it works.
Contour plays on light and shade to accentuate facial features and create the illusion of a sculpted face.
Contour comes in the form of cream or powder. Cream is often used to create a more intense chiselled look, whereas powder is used more on a daily basis.
The undertones should be cool, to mimic the natural tones of a shadow. If you try to use warm tones, such as bronzer, then it can look unnatural and muddy.
Contour should also be matte because the aim is to deepen the natural lines of the face, whereas a shimmer would make them appear raised.
What do I Need to Contour?
There are different techniques to consider when learning how to contour, depending on the types of products and brushes you want to use.
Products
[/vc_column_text][vc_single_image image=”3010″ img_size=”full” alignment=”center”][vc_column_text]Since the contour hype has reached its peak, so have the number of products available.
Depending on the heaviness of your makeup look, you may opt for a powder or cream.
Cream contouring creates a heavier look and enhances skin coverage. You may even choose to intensify the look further by layering powder contour over the top.
Cream contour comes in palette or stick form. Palettes will usually contain a few contour and highlight shades. Yellow toned shades are suitable for highlighting, because they warm and brighten the face.
Sticks are portable and easy to use because they allow you to draw the contour straight onto the face instead of using a brush.
Powder contour also comes in palette form. You can purchase mini palettes with one or two shades. Larger palettes have a variety of tones which will allow you to tailor the contour to different clients.
Brushes
A flat angled brush is the most suitable for mapping out cream contour lines on the face. A sponge or stippling brush is used to blend them out.
A fluffy angled brush is the most effective for applying powder, so you can hit all the angles of the face and blend it out easily.
Baking with a sponge and translucent powder will help to intensify the highlighted parts of the face. Loose powder is packed under the eyes and cheekbones to carve out the contour lines further. Once the powder has set, it’s wiped away with a fluffy brush, leaving the skin mattified.
How do I Contour?
[/vc_column_text][vc_column_text]Despite the thousands of complicated tutorials floating around on social media, contouring isn’t as scary as it may first seem.
There are different types of contour for the areas you want to target:
Face
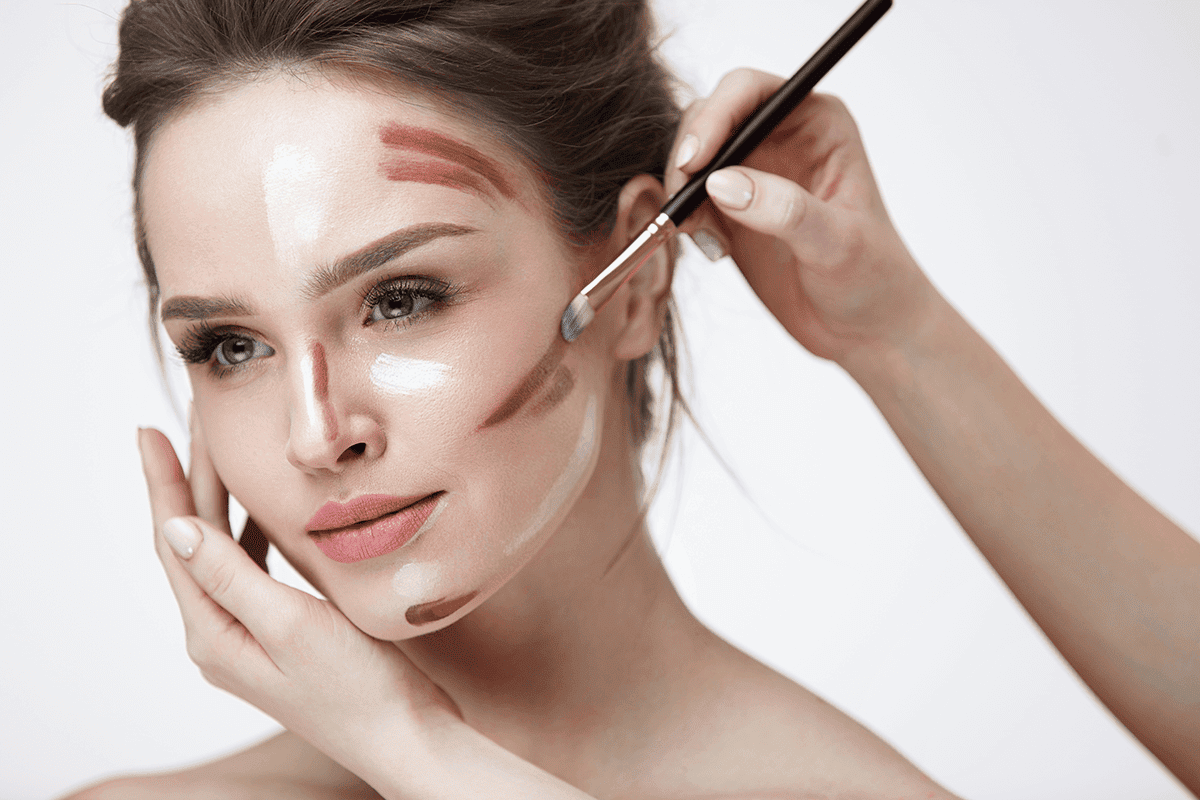
You should only consider contouring once a base of foundation is applied. Cream contour is applied and blended into a wet foundation base. Powder contour should only be applied onto a set base, so it’s easier to blend and doesn’t go muddy.
It’s essential to tailor the makeup to the client’s face shape, to get the best results. The main face shapes are oval, heart, round and square. For example, you should concentrate more on defining the cheekbones of an oval face shape, while you would focus on enhancing the jawline of a round face. [/vc_column_text][vc_single_image image=”3013″ img_size=”full” alignment=”center”][vc_column_text]The general rule is to contour the forehead, cheekbones and jawline, then highlight the under eyes, middle of the forehead and chin. So if you’re unsure of the client’s face shape, follow the general rules and add more where you think necessary.
A beginner-friendly method of cream contouring is to draw a ‘3’ shape on each side of the face as this will target the forehead, cheekbones and jawline.
Cheek contour should always be applied at an angle from the ears down to the lips to lift the facial features. The higher you can go, the better.
Applying contour to the edge of the hairline will make the forehead appear smaller, so if your client already has a small face, it’s important to contour lightly in this area.
Powder is a little easier for beginners to work with because the application technique is similar to that of bronzer.
Simply dip your brush into the product and slowly build up the contour, making sure to blend it into the skin thoroughly.
For extra definition, you can go in with a smaller brush to create a more intense line at the deepest point of the cheekbone.
TOP TIP: Place a flat edge under the cheek when contouring to get a straight line and chiselled cheekbones.
Contour on the jawline should be blended down the neck to avoid harsh lines and colour differences. [/vc_column_text][vc_video link=”https://www.youtube.com/watch?v=A1CT0CwnVYg” align=”center”][vc_column_text]
Highlighting
Highlighting the face is just as crucial as contouring if you want to exaggerate all of the client’s natural features.[/vc_column_text][vc_column_text]Apply a light concealer or powder onto areas that you want to illuminate. This includes the under eyes, middle of the forehead, bridge of the nose and chin.
Cream highlight should be applied with a flat brush and blended out with sponge or stippling brush.
Some artists choose to map out both the highlight and contour at once, then blend them out together. While others blend out the highlight first, then apply contour on top. It doesn’t matter which method you choose, go with which one you prefer.
Set the highlighted areas with a translucent or banana powder – this will not only mattify the look but also brighten the area further. [/vc_column_text][vc_column_text]
Strobing
[/vc_column_text][vc_column_text]This technique is used frequently by celebrity MUAs to create a dewy glow, making the skin look radiant and youthful.
Strobing involves taking a shimmer highlight in powder or liquid form and applying it to the highest points of the face. This can include the cheekbones, cupids bow, brow bones and chin. [/vc_column_text][vc_column_text]
Nose
When done correctly, nose contour can make the client look as though they’ve been under the knife!
Follow these steps to creating the perfect, chiselled nose: [/vc_column_text][vc_video link=”https://www.youtube.com/watch?v=hpTtLT_OLLw” align=”center”][vc_column_text]– Take a light contour shade and a small angled brush and draw two lines on either side of the bridge of the nose – the closer the lines, the smaller the nose
– To shorten the nose, contour around the nostrils
– Blend the edges with a buffing brush but don’t spread the product outwards into the undereye
– It’s important to blend out any harsh lines, so it looks natural
– Highlight the bridge and tip of the nose with a small blending brush. This will make it look even thinner and create a glow.
Lips
If you’re creating a full glam look, lip contour is perfect for adding extra definition to the face. [/vc_column_text][vc_column_text]Contour lines help make the lips look more prominent.
Line the edge of the lips with a light brown contour colour and blend inwards. Defining the lips with a matte contour means you can overline and make them appear larger than they are.
To make the pout bigger, draw contour lines on the top and bottom lips to create a 3D effect.
Apply a lipstick shade of your choice over the top to blend everything together.
Concentrate a white highlight shade in the middle of the lips to enhance the client’s pout.
Decolletage
[/vc_column_text][vc_single_image image=”3018″ img_size=”full” alignment=”center”][vc_column_text]Contouring the chest area helps to blend the face makeup into the body and achieve an entirely made-up look.
Carve out the collarbones and cleavage with a contour shade to exaggerate the natural lines, then blend.
TOP TIP: If the client’s collarbones aren’t visible, ask them to raise their shoulders to make them pop out.
Highlight the most protruding points of the collarbones and the tips of the shoulders to make them pop and look glowy.
Body
This technique is often used for photoshoot or evening makeup.
Foundation and highlighter are applied on the arms and legs to give the client a fully airbrushed look. Body foundation is also suitable for clients who have skin conditions such as psoriasis or eczema that they want to conceal for special events.
Body shimmer creates an all-over glow and looks youthful in photographs.
Some trends have gone as far as hand and feet contouring, but this isn’t very common.[/vc_column_text][vc_cta h2=”Always wanted to be a professional MUA?” txt_align=”center” add_button=”bottom” btn_title=”Makeup Artistry Courses” btn_style=”custom” btn_custom_text=”#666666″ btn_size=”lg” btn_align=”center” btn_link=”url:https%3A%2F%2Fposhnailz.co.uk%2Ftraining%2F%3Flocation%3D%26course_type%3D28|||”]
WE OFFER INDUSTRY LEVEL MAKEUP ARTISTRY COURSES ACROSS EIGHT TRAINING CENTRES!
[/vc_cta][vc_column_text]
While heavy contour may not be suitable for everyday wear, it’s one of the hottest trends in the beauty community right now. So, once you’ve practised how to contour, you can start sculpting sharp cheekbones and creating glows that are bound to impress your clients.
[/vc_column_text][/vc_column][/vc_row]